
This page shows some personal bits of wisdom and stupidity as I become a little less n00b everyday. It's mostly Terminal one-liners and small scripts for now. You can expect some longer articles in 2016.
GNU Octave is my language of choice when I am working on DSP algorithms. When a task is more in the area of system maintenance or adminstration, I switch to Bash. Recently I've also made my first steps in BASIC while working on a little retro project. BASIC really made me appreciate how far programming has come.
Also recently, I made back-ups of about 100 floppy disks. Check out the articles below to learn what I've gathered from the whole ordeal. My ramblings focus on 3,5" floppies but most of the information is valid for any type of disk.
Before I talk about dd and ddrescue, I'd like to give a few pointers regarding the hardware side of the story. If you happen to have two floppy disk drives (FDD) and two slots available in what's probably a big and heavy desktop machine, definitely put both drives in. I've had disks work in drive A: while failing in B: and vice versa without one FDD performing particularly better than the other.
Cleaning: dirt on the read heads of the FDD or inside disks can prevent a good read-out. You can clean the read heads of a drive with a cotton swab and some rubbing alcohol. I'd try this if a FDD can't read a disk you know is good. If you pull a floppy's jacket to the side you can see the actual disk. Using the metal center piece to rotate it, check the surface on both sides for dirt, scratches, creases, etc. Actually, I salvaged a couple of disks by simply doing a few rotations clockwise and counter-clockwise manually while applying a little bit of pressure. When cleaning it, try to work as locally as possible, so you don't accidentally rub away "the good stuff".
For dirty disks I'd recommend making a quick image with ddrescue skipping over the bad parts. Then clean it and image it again. This is probably your best bet, because readable parts get read upfront and ddrescue can merge several images afterwards.
If you're really serious about salvaging data of floppy disks, there are several solutions on the market, both services and products. Both cost x amount of money (x > 0), which was more than I wanted to spend on it. If you don't have an old machine with FDD, or a mobo with FDD support you can try a USB FDD. They are still being made and pretty cheap. But I'm not sure how they perform with faulty disks. There are companies that specialise in data rescue for a substantial amount of x. In the products section you've got:
To make an image of a floppy disk, open up a Terminal. Make sure the drive isn't mounted, then enter:
dd if=/dev/fd0 of=~/fd-img/example.img bs=1440k conv=notrunc
/dev/fd0 is the default for the first (and often only) floppy drive. Yours may be different. If all goes well, great! Unfortunately, chances are high your floppies will have bad sectors which dd can't read. Then dd will return an error, probably something about I/O. That's where ddrescue enters the stage.
bs=1440k means the entire floppy is imaged as a single block. This supposedly matters for boot disks, (but I could not find an official reference to confirm this) preserving both data and boot sectors correctly in one nice, single image.
The substrate of magnetic material which carries the actual data on a floppy degrades over time. More and more sectors are bound to go bad. The storage conditions have some influence on this ofcourse, but inevitably they will meet their demise. So let's try to save as much as we can. ddrescue has a syntax which is very similar to the one of dd. The input file (if) and output file (of) are implicit as you can see. A logfile keeps track of the rescue process.
ddrescue /dev/fd0 ~/ddr-example.img ~/example.log
This is a "bare bones" run, there any many options to tweak and optimize the process. Enter man ddrescue to get the "short" list of documentation. If your system doesn't come with ddrescue preinstalled: build it from source or use MacPorts on OS X. On Linux I'd fire up a Terminal and type:
sudo apt-get install ddrescue
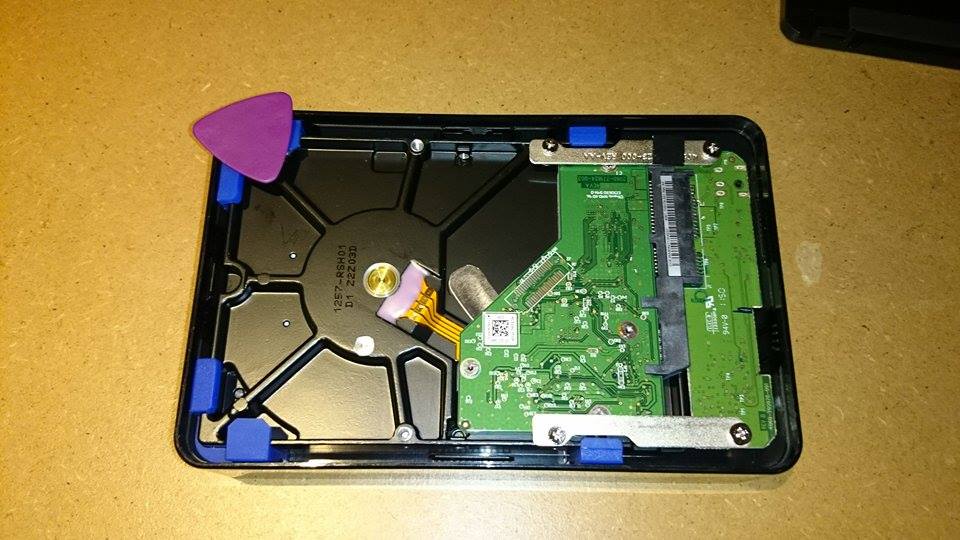
A little geek session trying to help my buddy revive his 2 TB external drive. A lot of external drives are just internal SATA-drives in a nice box, with a control board to handle power and an USB-connection. If the problem is inside the control board you may be lucky and still have a working drive. Even though my buddy still has warranty on the damn thing, he was ok with opening it because a vendor will just replace the disk, but won't recover the data. He had some important projects on there, so we went for it!
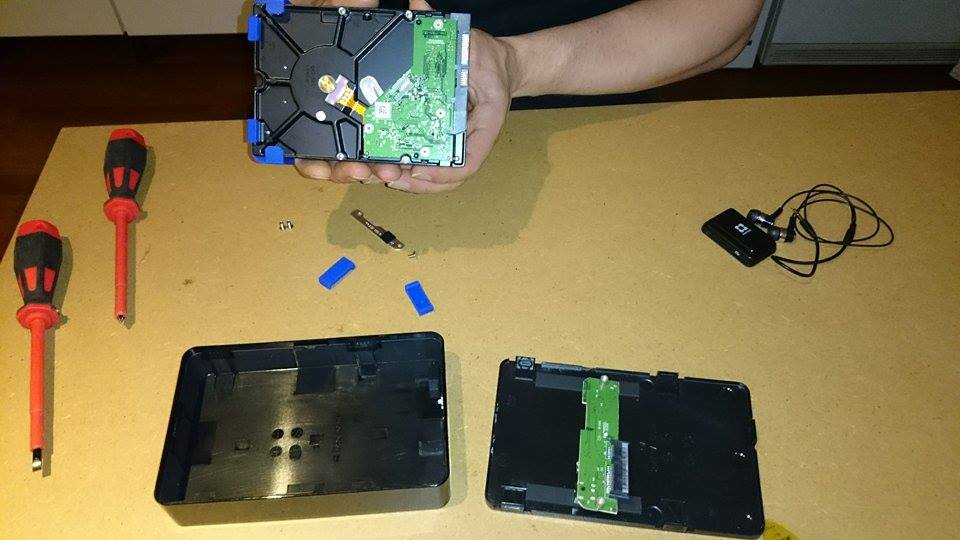
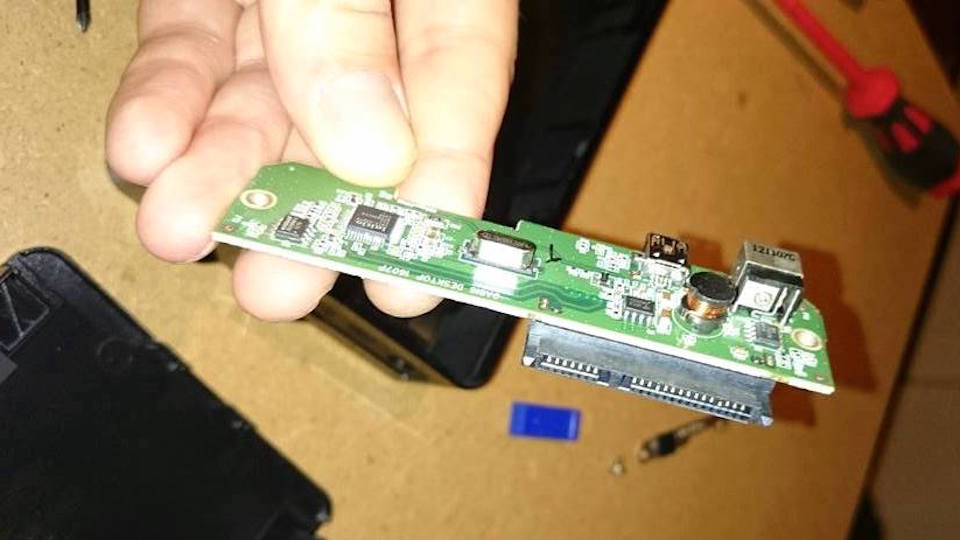
A little trick I learnt from fixing an MP3 player: guitar picks are an awesome tool to pry open tight-fitted enclosures. I actually used three of them, keeping spots open where the top case clicks in the bottom while going all around. The logic board shows no obvious defects like burnt fuses or loose connectors. All the usual tools to investigate disks in Linux turned up nothing. There was no entry for it in /dev/ so then it starts to get hopeless. When connected, it still blinks, oh how nice that it still blinks. So... looks like we have a data zombie unfortunately :(
To upgrade a machine to the latest version of OS X you could just download the upgrade from the Mac App Store and run the installer. This certainly is the easiest way and the method Apple recommends. But even if you intend to go that route there are still good reasons to put a bootable version of the installer on a thumb drive or external hard disk:
So basically, it can save time and bandwidth, help those with 0 bandwith and is a life saver when shit hits the fan. Now, let's get to it!
Open the Mac App Store from your Dock or Applications folder. Apple is usually very in your face with their latest version of the operating system so I'm pretty sure you'll spot it right away. Click on the 'Download' button. You may need to log in at this point. The download will take a while. When it is finished downloading you'll find the installer in your Applications folder. Connect a thumb drive or external hard disk. NOTE: the drive will be completely erased to create the bootdisk! Any drive about 6 GB or bigger will do. I use a 8 GB USB 3.0 drive. Fire up the Terminal (located in your Utilities folder) and run (password required):
sudo /Applications/Install\ OS\ X\ El\ Capitan.app/Contents/Resources/createinstallmedia --volume /Volumes/Untitled --applicationpath /Applications/Install\ OS\ X\ El\ Capitan.app --nointeraction
Let's break it down: In OS X, a program with an .app extension is a folder just like any other folder. In this case, the folder 'Install OS X El Capitan.app' contains a folder 'Contents', which contains another folder called 'Resources', which contains a utility to make the bootable USB drive, called 'createinstallmedia'.
You need sudo for the right permissions.
With --volume you direct the utility to the USB drive you want to use. 'Untitled' is a default name after formatting a drive in Disk Utility. Either change 'Untitled' to the name of your USB drive in the above command, or name the drive 'Untitled'.
Next it tells createinstallmedia where to find the install folder with --applicationpath (could theoretically be in a different spot, but not by default).
Finally --nointeractions skips confirming you really want to make a bootable usb drive. If you're not sure, then why enter all this stuff in the first place, right?
Just to reiterate, the thumb drive will be completey erased and overwritten with the installer. On my machine it takes about 10 minutes before it is done. To boot to the installer press Option ⌥ (Alt) right after turning on.